Handmade Gift Ideas
- Read time: 15 minutes
- Written by: Crafters
There’s something extra special about handmade gifts, an extra touch of magic that comes with using your hands to craft a personalised present for a loved one.
If you fancy creating and giving handmade gifts, but aren’t sure where to begin- we’ve come up with some ideas for hand crafted gifts to get you started!
Read on for inspiration to craft perfectly personal handmade gifts that are truly one of a kind.

These craft projects create personal and professional-looking gifts that are sure to raise a smile, but they’re so simple to make – perfect for all levels of crafter!
Photo Albums & Memory Books
Giving someone the opportunity time to remember and relive happy and cherished moments via photographs and mementos is a thoughtful and caring gift.
With the Gemini Precious Memories Collection you can create personalised photograph albums and memory books – with interactive Envelope, Waterfall and Tabbed Page and Purse Card pages designed to hold photographs, tickets, notes and more!

Once you have chosen how many pages to include and created your book spine using the Precious Memories Spine Die, the pages that have been die-cut using other sets in the collection can be easily attached. So you can create your own customised book – however you want!
How to craft a Precious Memories book
- Using a Gemini Die Cutting Machine, die-cut the Precious Memories Album Spine from sturdy cardstock to create a book with 6 pages. For more pages, die-cut a second spine. For larger books, try the Gemini 8″ Album Spine Die or the 10″ Album Spine Die
- If you’ve created more than one spine, join them together by removing the very end section up to the first score from your first spine.
- Then from your second spine, start at one end and count in two lots of the double ‘x’ sections and the one score space after, then trim the rest away.
- Glue the small score space from small spine section you have to the main spine section to create a larger album
- Fold each of the score lines and burnish. Place red liner tape on one side of each ‘x’ section and adhere the other ‘x’ section to it. These will create your page points.
- Cut cardstock to 10.1cm x 15cm (or to fit your album size if larger) to create of your pages and adhere these to your page points. Cover each of your pages back and front with patterned papers. If you want to create pockets in the paper, this will need to be done first before adhering into position
- Follow the instructions on the other Precious Memories Dies to create your interactive elements and organise your memory book to your liking
- To finish the spine, cut a piece of matt cardstock to 10.1cm x 9cm. Score at 1.5cm and 7.5cm on the 9cm sides, and adhere the 1.5cm sections to the front and back of the album, leaving the central but loose to create the outer spine
As these sets allow you to decorate and embellish your book however you choose, they’re perfect for special occasions such as weddings or anniversaries!
Personalised Jigsaws
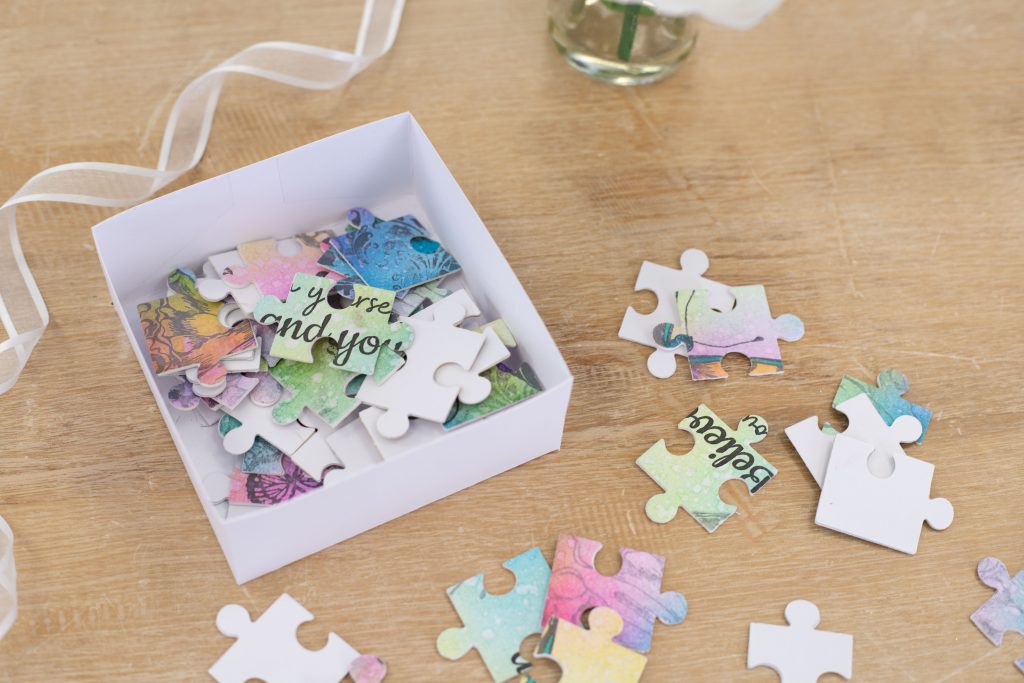
If you’re after something a little bit different then a personalised jigsaw, featuring a photograph of the birthday girl or boy is sure to do the trick!
With the Gemini Shaped Jigsaw Collection you can create cute jigsaws in the shape of hearts, butterflies, speech bubbles, stars and more! You can add a photograph, image or draw and decorate your design to create the most memorable keepsakes!

The Multi Media dies in these sets are able to cut through mountboard, corkboard, paper, card, faux leather and much more – so the sky’s the limit when it comes to these customised jigsaws! Here’s how to create your own..
How to create Gemini Shaped Jigsaws
- Chose your Gemini Shaped Jigsaw set, your material (mountboard, card, cork etc) and the image you’d like to use
- Adhere your image to your material
- Create the following plate combination from bottom to top: Clear Cutting Plate, Material with image, Gemini Shaped Jigsaw Die with blade side facing down, Plastic Shim, Clear Cutting Plate
- Roll through your Gemini die-cutting machine – voila a personalised jigsaw ready to be played with and enjoyed again and again!

It’s so simple, once you start crafting your own jigsaws you won’t stop. Here are a few gift ideas to get you up and running:
- Pop those big questions by writing your message on a jigsaw to be pieced together
- Create truly memorable wedding favours with a puzzle forming a picture of the happy couple!
- Keep the little ones in your life occupied with jigsaws featuring their favourite family members, characters and more
- Let family and friends know about your big news, whether it’s an engagement, new job or a new arrival with a message ready to be pieced together
For a fully handmade gift, why not craft your own presentation box to pop your jigsaw pieces into?
Customised Home Decor and Accessories
If you’re interested in dipping a toe into crafting your own handmade gifts, but haven’t tried craft before, or haven’t invested in a die cutting machine just yet – don’t worry, we have some amazing DIY gift ideas for you!
A perfectly ordinary item like a plate, glass, plant pot or photo frame can be turned into something spectacular all through the art of customisation! You don’t even need a huge tool kit of crafting supplies to get started, with Spectrum Noir Acrylic Paint Markers the world is your canvas!

These clever multi-surface markers will allow you to paint, draw, colour and decorate on
canvas, ceramic, glass, wood, porcelain, wood, fabric, card, paper and more.
And with a range of stunning shades available, they’re perfect for personalising gifts – just let your creativity loose!
Here are a few ideas to get you started:
- Host the most elegant dinner parties with beautiful place settings written on pieces of driftwood or stones
- Make your garden or balcony burst with colour all year round with colourfully decorated plant pots
- Customise your crockery with personalised plates, glasses and cups – no more arguments at dinner time!
- Add some extra details and embellishments to photograph and picture frames – to make those precious memories even more special
- Give thoughtful and personal gifts this Christmas with customised ornaments and baubles
Craft Flowers
The classic beautiful bouquet of flowers, or a cute pot plant have been classic birthday, anniversary and Christmas gifts for decades. And for good reason, who doesn’t love brightening up their world with some sweet blooms? Well what if we told you you can make your own bouquets that last for ever and you don’t even need green fingers! Craft flowers are a fantastically versatile handmade gift project, here are a few suggestions!
- Give your gift tags and bags some cute 3D decorations
- Create the most beautiful place settings and centrepieces
- Wreaths and garlands for all seasons
- Faux bouquets that will last forever
- Create the sweetest hair accessories!

When it comes to crafting flowers, there’s an entire florist’s shop of choice out there! Flower Forming Foam is a great way to create beautifully realistic 3D flowers. Crafter’s Companion’s specially formulated foam sheets that can be die-cut and heated to create the most realistic looking petals imaginable! And there are so many floral dies to browse, from lilies and peonies to tulips, hydrangeas, and poppies plus a cute template to create a presentation box!
How to create flowers using Flower Forming Foam:
- Follow the instructions in your die set to cut out your your petal shapes from your chosen foam using a die-cutting machine. You can add colour using Spectrum Noir Water Reactive Inkpads if you like
- Take the largest petal shape and heat it using your preferred method. The edges should start to curl in slightly, which means it’s ready for moulding.
- To get a rounded petal effect, take a Moulding Ball Tool and push the petal into a foam sponge, twisting and rounding to form the shape. You can also use the Petal Distress Tool by laying the heated petal on to the silicone tray and running the finger tool over it to create a rough edge effect. If you don’t have tools, you can get experimental with twisting, crinkling, scrunching and curling your petals by hand.
- Repeat the manipulation process with the smaller petals until all of your petals are complete.
- Warm up your glue gun, then add a blob into the centre of the largest petal shape. Stick the next smallest petals on top, then add another blob of glue to the centre of the petal shape and stick the next smallest on top. Continue until all of your petals have been used.
- Take a Pokey Tool, pencil or another sharp point and poke a hole through the middle of the layers.
- Gather up a group of Stamens and add a blob of hot glue around them, close to the top, then pull them through the hole that you created in the flower until they sit in a natural position. Trim the excess from the bottom and your basic flower is done!
From this point, you can create leaves, manipulate them following the same steps, then glue them on with the hot glue. The possibilities just grow and grow!

The Sharon Callis Sensational Succulents range allows you to create a tropical terrarium of lush succulents – complete with plant pots and labels! These succulents are created using a craft technique called quilling – here’s a step-by-step guide:

How to make a Quilled Plant
- Choose your die set
- Choose your card or paperstock – use thin cardstock
- Create the following plate combination
- Clear Cutting Plate
- Plastic Shim
- Magnetic Shim
- Die with the blade side facing upwards
- Chosen card or paperstock
- Clear Cutting Plate
- Roll through your Gemini Die-Cutting machine
- Repeat with all of the dies in your set – you can use different colours for different layers if you like!
- Layer up the die cut pieces largest to smallest if there is more than one
- Roll up your die-cut pieces, and watch as your plant grows before your eyes!
- Slot stamens in the middle if required
- Secure together with tape or all-purpose glue
- Use Spectrum Noir Harmony Water-Reactive Inkpads to add colour if you like

Gift Boxes
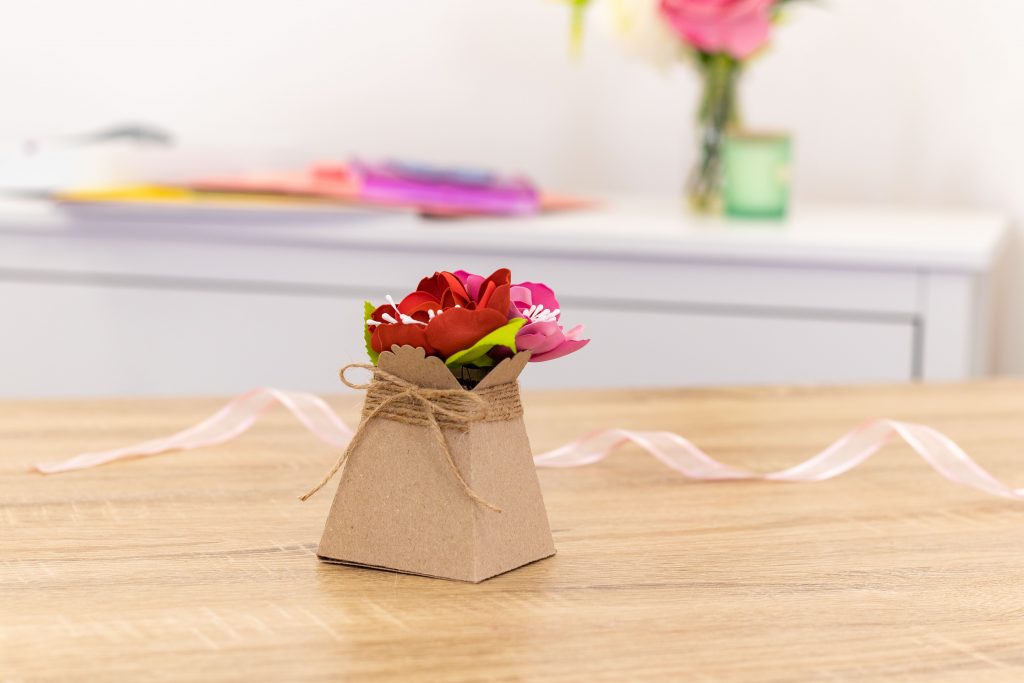
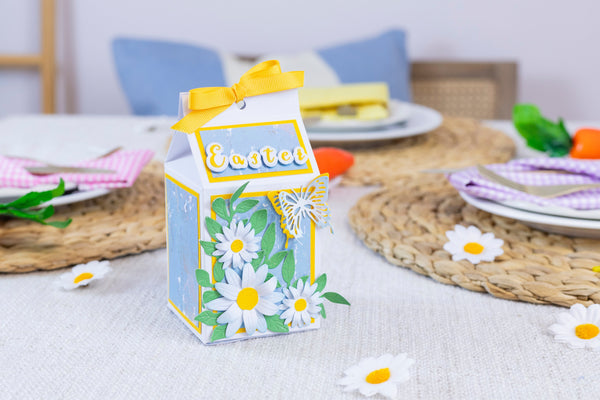
The perfect presentation is so important when it comes to gifting after all you want your carefully crafted gift to look just right! That’s where gift boxes come in. There are so many shapes and sizes to try, from Milk Carton and Picnic Box to cute Favour Boxes!

Today, we’re going to focus on Gemini Dimensionals Favour Boxes as each box can be used as a way to hold gifts, or filled with sweets or small trinkets to create a cute present in itself!
Each die and stencil set includes a stencil to draw around, cut out and build your box – no die-cutting required! Also included are a set of beautiful dies to decorate the side panels with gorgeous cut-out designs. But if you don’t have a die-cutting machine yet don’t worry, you can decorate the sides of your box with stencilled, stamped or coloured designs!
If you are a die-cutter, each set includes a set of dies to create a different stunning design, and the range has been sized so you can mix and match boxes and die-cut decorations!

How to make a Gemini Dimensionals Favour Box
If you’re a first time box maker this is the perfect collection to start with, so let’s get cracking!
- Choose your favour box stencil and cardstock – we recommend using card weight of 250gsm upwards
- Place your stencil on top of the cardstock and lightly draw around the outer edge with a pencil
- Now trace the inner lines with a pencil – these will be your score lines
- Take off the stencil and carefully cut out your box shape
- Score using your pencil score lines as a guide, use a ruler for diagonal lines if you like
- Fold your box, using a Bone Folder tool to burnish the folds
- Now it’s time to consider your decoration, the dies included in the set can cut a design directly into the side panels (perfect for tealights!) or you can cut onto a second piece of cardstock in a complementary shade
- Choose your decorative dies for the side panels, create your plate combination using the helpful Sandwich Guide in the instruction manual and run through your die-cutting machine
- Lay your box template flat and affix your die-cut decoration to the side panels – for best results we advise using Collall All Purpose Glue with a Fine Tip Applicator or a Crafter’s Companion Glue Tape Pen (dots)
- Now it’s time to build the box – fold the side panels and stick the two tabs together with Collall All Purpose Glue, Red Liner Tape, or Crafter’s Companion Permanent Glue Tape Pen
- Do the same with the bottom tabs before sticking the bottom panel down
- Fold up your locking or closing mechanism
- Pop on any extra stick-on pearls, gems or ribbons for a final flourish and you’re done!

We hope these handmade gift ideas have got you thinking of what you could make for the next big occasion! If you’re keen for even more gift making inspiration why not tune into the below episode of The Craft Class on Crafter’s TV?
For a warm welcome to all sorts of craft techniques, join us for more episodes of The Craft Class on Crafter’s TV to unlock your creative potential!
If this post has encouraged you to craft some handmade gifts we’d love to see your finished projects on social media. Share your photos with us on Facebook, Twitter or Instagram using the hashtag #crafterscompanion.


